
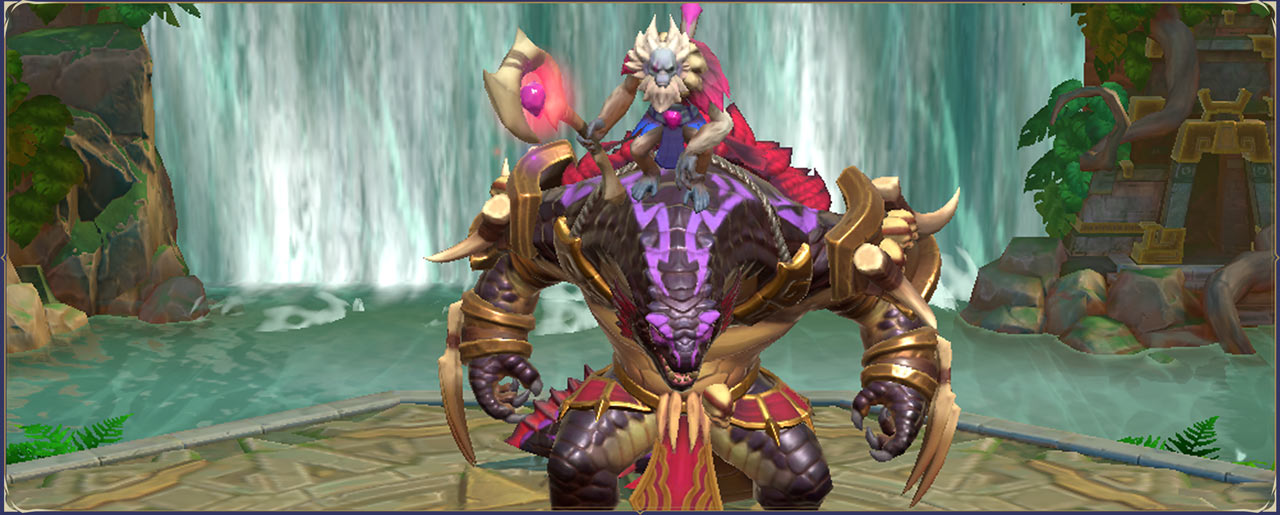
KOLTMOS – THE DOOM SHAMAN
OVERVIEW
Riding on the back of Reptis, his giant lizard steed, Koltmos the Doom Shaman is one cheeky monkey.
Engage him up close and you’re doomed to fail. Ranged Attackers are the key to success against Koltmos, so you can keep out of range of his deadly close-range swipes. Thanks to Reptis' thick hide, Koltmos is also immune to Bleed debuffs – so this fight's a matter of using direct damage!
Most of the fight hinges on Koltmos’ Deadsun Ritual – a 15 second long channel that will see him deal unavoidable damage to your party and summon 4 Doomclaws to eventually heal and buff him.
To succeed, you’ll need to have one Invoker who can keep Koltmos’ attention, enough burst damage to interrupt his Deadsun Ritual, and a squad of reliable ranged attackers who can take out his sacrifices and stop him ascending to untold heights of power.
DO
✓ Bring Ranged Attackers
✓ Use Invokers or Relics with Bloodrot and Manashock Tolerances
✓ Take out the Doomclaws!
✓ Bring decent burst damage – if you can deal damage quickly, you can avoid Koltmos’ powerful AOE attack from Deadsun Ritual
DON'T
✕ Bring all Melee Attackers. They’re useless for dispatching Koltmos’ Doomclaws
✕ Group up around Koltmos
✕ Forget to take out the Doomclaws!
✕ Try to use Bleed – Koltmos takes 80% less damage from Bleed
SKILL BREAKDOWN
Combo Attack #1
Attacks 1 enemy, dealing N damage.
Combo Attack #2
Attacks 3 enemies in a 15m radius, from a distance of 10m, dealing N damage per hit.
Combo Attack #3
Attacks 1 enemy 2 times, dealing N damage per hit.
Combo Attack #4
Attacks all enemies in a 6x15m area in front of Koltmos, dealing N damage per hit.
Skill 1 – Claws of the Great Cult
Koltmos commands Reptis to maul an enemy.
Attacks 1 enemy 4 times, dealing N damage per hit. Damage is multiplied by the number of enemies in a 5m radius of Koltmos.
The first hit casts Manashock Corruption on the target, lasting 5s. Manashock Corruption instantly decreases the target's Ultimate Mana by 5%. The fourth hit casts 1 stack of Bloodrot Corruption on the target. The Bloodrot Corruption ticks 1 time every 10s. Each tick damages the target by 0.1% of their MAX HP. Each stack of Bloodrot Corruption decreases the size of all heals the target receives by 1%.
TIP #1: Spread out! This attack can get potentially 5x stronger, if you have your entire party all swinging on Koltmos at close range. Minimize its damage by spreading out and having a single Tank occupying the Doom Shaman from close range, while Ranged Invokers attack from range.
Skill 2 – Inescapable Doom
Koltmos casts Doomwhisps that seek out all enemies.
Attacks all enemies in the arena, from a distance of 10m, dealing N per hit.
Each hit casts 1 stack of Bloodrot Corruption on the target. The Bloodrot Corruption ticks 1 time every 10s. Each tick damages the target by 0.1% of their MAX HP. Each stack of Bloodrot Corruption decreases the size of all heals the target receives by 1%.
Then, casts a [50% ATK Down] debuff on all enemies in a 5m radius, lasting 7s.
TIP #1: You cannot avoid the Doomwhisps. That initial barrage of Doomwhisps will guarantee Bloodrot Corruption for your whole squad. Bring some Invokers and Relics with Bloodrot Tolerance to blunt its effects.
TIP #2: Don't stay too close. Are you starting to see a pattern here? Ensure your main attackers are far away from Koltmos, so they aren’t hit by the ATK Down debuff.
Skill 3 – Creeping Doom
Reptis prowls, purging mana from everyone in its path.
Reptis prowls through a 10x25m path, towards the furthest enemy in a 15m radius, damaging each enemy hit, dealing N damage per hit. Each hit casts Manashock Corruption on the target, lasting 5s. Manashock Corruption instantly decreases the target's Ultimate Mana by 5%.
TIP #1: Move! Reptis lunges into this prowl at great speed, so react quickly and spread out. You’ll want to keep your Ultimate Mana stocked up to deal with his Deadsun Ritual later.
Skill 4 – Donate the Worthy
The Doomclaws donate themselves to Koltmos, as he absorbs power from their souls.
Absorbs power from the Doomclaws, taking their life in the process.
Koltmos is healed by 5% of his MAX HP for each Doomclaw taken.
Koltmos gains +20% ATK, +5% Crit Rate, and +25% Crit Damage for each Doomclaw taken.
TIP #1: Take out the Doomclaws! The only way to stop this raft of buffs and heals for Koltmos is to get rid of the cultists he spawns. They spawn in four set points across an impassable river in the arena – split your Ranged Attackers into two teams to take all of the Doomclaws out quickly.
TIP #2: The boosts to Koltmos’ ATK, Crit Rate and Crit DMG are permanent stat gains, not buffs. You can’t steal or block them – so taking out the Doomclaws is your top priority!
Skill 5 – Deadsun Ritual
Koltmos conducts a ritual, calling totems and summoning Doomclaws.
Channels for 15s. If Koltmos successfully channels for 15s, Koltmos attacks all enemies in the arena, dealing N damage.
Channeling will be interrupted if Koltmos loses 10% of his MAX HP.
After channeling, even if interrupted, summons 4 Doomclaws.
TIP #1: Give it all you got! Koltmos is completely defenseless while he’s channeling, so hit him with everything you have. Ultimates, Active Skills, Titan Skills – if you have it ready, use it! Do 10% of his MAX HP and you won’t have to worry about an unavoidable, party-wide attack.
Passive – Blood of Coldscale
Koltmos takes 80% less damage from [Bleed] debuffs.
CORRUPTIONS
Koltmos has two Corruptions: one Damage Corruption (Bloodrot), and one Control Corruption (Manashock).
Each of Koltmos’ attacks will deal extra damage as Bloodrot Damage, which is not decreased by your Invokers’ DEF Stat.
DAMAGE CORRUPTION – BLOODROT

Bloodrot Corruption
Each stack of Bloodrot damages the target by a percentage of their MAX HP every tick. Each stack also decreases the size of all heals the target receives. Infinite duration.
Bloodrot Tolerance
Bloodrot Corruption is a damage-over-time effect that damages the recipient by a percentage of their MAX HP every tick. It also decreases the size of all heals the target receives by a certain percentage. Bloodrot Corruption has an infinite duration and cannot be removed. Bloodrot Corruption stacks additively, so each stack of Bloodrot directly increases the damage per tick along with the Heal Size reduction.
Bosses with Bloodrot Corruption also deal direct Bloodrot damage from their Skills, in addition to their regular damage. Direct Bloodrot damage ignores the target's DEF stat, and can only be decreased by the target's Bloodrot Tolerance.
Increasing an Invoker's Bloodrot Tolerance will decrease all Bloodrot damage by the Invoker's Tolerance percentage, along with decreasing the effects of the Heal Size reduction.
CONTROL CORRUPTION – MANASHOCK

Manashock Corruption
Stuns the target, making them unable to move or use Skills. Decreases all Ultimate and Titan Mana gained by 50%.
Manashock Tolerance
Manashock Corruption stuns the target, while also decreasing the amount of Ultimate and Titan Mana the target gains from any source.
This can massively decrease the effectiveness of a Support Invoker whose job it is to generate Mana for their team, as even if they have high Manashock Tolerance themselves, their power is greatly decreased if their teammates only receive 50% of the Mana they generate.
Increasing an Invoker's Manashock Tolerance decreases the duration of Manashock and its effects by the Invoker's Tolerance percentage, reducing the duration of the stun and decreasing the Mana gain penalty.
STRATEGY
Koltmos hits close-range Invokers hard, has access to unavoidable, party-wide attacks, and will get stronger and heal himself if you don’t stop his ritual.
You’ll need to bring a single Tank to bear the brunt of Koltmos’ up-close assaults, while the rest of your team is focused on dealing damage from range. While your Tank is busy dueling with Koltmos, your ranged forces can then also take out the Doomclaws that periodically spawn to strengthen their cult leader.
For Koltmos’ first Skill, Claws of the Great Cult, he commands Reptis to strike at the closest enemy – with this rain of claws getting stronger for each enemy in a 5m radius around him. If you only have one Invoker in that radius, this is significantly less scary of an attack.
So take our advice! Try a team with a single Tank, and the rest being those capable of ranged attacks. You will have to deal with your Tank taking on both Bloodrot and Manashock Corruption from this Skill, so do also bring a dedicated healer within your selection of ranged Invokers.
Skill 2, Inescapable Doom, is one that benefits from not being grouped around the Doom Shaman. While the initial Doomwisps barrage cannot be avoided, you can save your Ranged Invokers from taking a nasty 50% ATK Down debuff by, you guessed it, not being within 5m of Koltmos.
Skill 3, Creeping Doom, is a powerful lunge that has Koltmos charging towards your furthest attacker. Once Reptis rears up, he suddenly charges like a freight train, so be sure to move any Invokers in his path out of the way.
After finishing this lunge, Koltmos will begin channeling his Deadsun Ritual. Here, you’ve got 15 uninterrupted seconds to unleash hell on the Doom Shaman. Let every Skill lose, use that Titan Mana and do your best to interrupt this ritual. If you manage to deal damage equivalent to 10% of Koltmos’ MAX HP during the channel, you won’t get hit by the unavoidable follow-up attack. Happy days!
While you may have interrupted the ritual, you’re not out of the woods yet. No matter if you stopped the Deadsun Ritual or not, Koltmos will always summon 4 Doomclaws after the channel. These Doomclaws won’t stick around for long – as their sole purpose is to act as sacrifices to heal up Koltmos and boost his ATK, Crit Rate and Crit DMG.
These Doomclaws appear on 4 totems, located on the far side of the arena behind an impassable river. Melee Attackers cannot cross this river, the current is simply too strong. Your only option to take out these Doomclaws is via ranged attacks. Our advice – split your Ranged Invokers into two teams, and have them focus down 2 Doomclaws each. All the while, your Tank keeps Koltmos busy.
Koltmos is only healed or strengthened based on the amount of Doomclaws he is able to absorb – so dispatching some is better than dispatching none! As a fail-safe, you may want to have Heal Reduction, along with Crit Rate and Crit DMG reduction debuffs at your disposal, to help counteract any stat gains Koltmos does manage to receive.
So, in a nutshell – bring plenty of Ranged Invokers, don’t let Koltmos complete the Deadsun Ritual, take out the Doomclaws and keep spread out.
Good luck!